POSITION MEASURES |
Together with the determination of the Wolf number, one of the main tasks of the amateurs who observe the Sun consists of the measurement of the sunspots positions. The interest of this work lies mainly, in its subsequent analysis to obtain information about periods of rotation, movements, sizes, speeds, inclination of the axis of the groups, spatial distributions, etc.
There are different procedures to measure, more or less accurately, the position of a sunspot. Here are some of the most representative:
Measures with a reticulum
This method can be considered as a form of the called "methods of transit", that are applied directly on the image provided by the telescope.
In order to put it into practice we need a digital stopwatch and an eyepiece with reticulum where we will couple a graduated circle to measure position angles. Of course, the solar filter is essential, in front of the objective. The procedure begins by orienting the reticulum and placing it to 0º, that means, in the direction North-South. Because of the diurnal motion, the crosshairs will be passing over the solar disk from West to East. We start the stopwatch when the reticulum touches the West limb and stop it when the reticulum coincides with the sunspot. Next we turn the eyepiece an angle “a” and repeat the operation. The position of the sunspot will be fixed by the angle and the two times taken (as we will see in the formulas later).
Identifying and reducing the main sources of error as much as possible is fundamental in order to get a high precision. These can be classified as follows:
Random errors. - All timigs are affected by an error of a random nature due to small causes impossible to control. The way to compensate these errors is to take different measures and calculate an average. It is not advisable to take more than three times except when the sunspot is near the limb (we will see the reason later).
Atmospheric conditions. - This point can be divided in three parts:
Orientation of the reticulum and angles of position (A.P.).- This is one of the factors that can influence in the result the most. The orientation must be as perfect as possible and do not care how long you are trying to get it. The correct way consists of taking advantage of the Solar diurnal motion and leaving a spot slipping along the line. It’s important that the sunspot moves on the line and not in a parallel path.
If we use an angle a = 20º, an error of 1º in the measurement of A.P. means an error of about 1º in the position of the sunspot (at least). For this reason, it is advisable that the graduated circle has a diameter as big as possible. A circle of 20 cm already allows to measure A.P. with a precision of about 0º,2.
It’s very useful to take a series of measures with an angle “a” and another with an angle “-a”. At the end we get a position for each angle and calculate an average. This does not solve a possible deviation of the reticulum but, at least, it reduces the consequences of the problem.
Also, be careful with any possible looseness in the eyepiece holder, because undesirable deviations can take place when the turns are made.
Power. – The diameter of a sunspot can get to measure some degrees and, as the line of the reticulum also has some thickness, it is not advisable working with few power because we need to resolve smaller structures properly. However, if we use too many increases, not only the effects of seeing would be increased but we could only cover a sector of the limb too little to be taken as a reference (especially with the sunspots that are far from the equator). A good eyepiece is the one that provides about 100x.
Of course, we can get good results with an eyepiece of few power, but the dispersion of the times we take seems to be greater. In addition, taking the direction of the reticulum will be a rather longer operation and this is important if we don’t have much time to observe.
With 100x and the sunspots far from the equator (specially if P is great), sometimes we must take the times near the field border and they could be affected by the distortion that the eyepiece produces in that zone. The measure with two angles (a/- a) also allows to compensate this problem, to a certain extent
Structure of the spots.- Something that has to be considered, and that is not as trivial as it seems, is the definition of what we understand by "position of the spot ", or in other words, the choice of the point that we are going to measure in successive days. Should we choose the geometric center? Maybe a nucleus? and, in this case, which of them? In addition, a spot is a very dynamic structure. The nuclei appear, disappear, move and change shape and size, so that it is impossible to predict the behavior of the detail that we have chosen to make the measurements. The experience of recent years tells us that it is best to choose the largest core, especially because it is usually more durable, but this does not always turn out to be the most suitable solution. What is important, to maintain consistency in our data, is to make sure we use the same detail every day.
Variation of parameters.- In the formulas there are five parameters (R, d, P, B0 , L0) that vary throughout the time we are measuring. The change in the first four is not important and, if the session has not been very long, we can interpolate its value for the central observation time. The main problem lies in the length of the central meridian. Keep in mind that the sun rotates approximately 0º,1 in about 10 minutes and, although it seems small, this value begins to be significant if we intend to obtain errors of a few tenths of a degree. The solution consists of interpolating a value of L0 for each spot.
We saw in the section on errors that it was advisable to take several times of each spot, but the variation that will suffer the parameters will limit the number of measures so it is not convenient to do more than three to not prolong the observation excessively. Also, if the spot is not close to the limbus, three times will suffice to ensure an adequate degree of accuracy. Logically, close to the limbus we can increase the number of measurements because the time invested in each of them will be less.
To summarize, let's see how the whole procedure can be developed during an observation of the Sun. First of all, we have to take care of the focus, because we need the image, and especially the limbo, to be as clear and defined as possible. Once the device is assembled, we have to orient the reticle and, for this, we will use the diurnal movement, causing a spot to slide along the thread. Next, we place the reticle in a North-South position, record the time and take three measurements, turn the eyepiece to an angle a and take another three measurements. Finally, we turn to an angle -a, measure again three times and note the time again. In case we want to measure more spots, we put the reticle at 0º and repeat the process. We only have to enter these data in the formulas, obtain a position with angle a, another with angle - a (which will not differ much from the first) and averaging both.
The error that this method usually produces is only a few tenths of a degree. In fact, the variation in the positions of a spot that can be observed on consecutive days is mainly due to its own movement.
The error depends on the position of the spot on the disk. In general, the error in latitude is usually greater than in the length for a spot in the center of the disk. The situation is reversed when the spot is very close to the limbus and, as is logical, the length can reach an imprecision of some degrees. However, sometimes excellent measurements can be obtained even at 80º of the central meridian.
The main drawback of the method is that sometimes you have to invest an excessive amount of time to get all the times. However there are different ways to reduce the duration of the measures.
A chronometer with memories (if possible 10 or more) is very helpful in allowing all the measurements to be obtained with each angle at once.
When there are several nearby or aligned spots, one of them can be measured with respect to the limbus and then used as a reference to time the others. In this case we must take care because if we get the wrong time with the first, that error will spread to the rest.
You can also take only one time with each angle instead of three. Although in this way the accuracy decreases somewhat, the error is still maintained below 1 °.
As every day the situation on the Sun is different, there is no choice but to adapt to the circumstances, but in general, considering the previous points, it may take about 20 minutes to measure all the groups present on the disk during a high activity phase. .
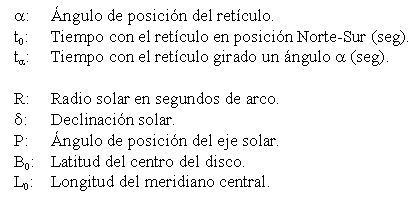
Data:
 |
Rectangular coordinates on the apparent Sun:
 |
Correction of angle P:
 |
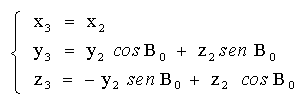
Correction of angle B0. Rectangular coordinates on the real Sun:
 |
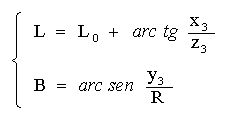
Heliographic coordinates:
 |
These formulas are valid as long as we use the West limb. In case of using the East limb as a reference, it is necessary to change the sign to x1 and y1.
Measures with templates
The simplest way to measure the position of the spots is to use a template on a drawing or a photograph of the Sun. The meridian of the template must coincide with the axis of solar rotation and, therefore, we must orient the image in the most accurate possible.
If we use a drawing, it must be done by projection and in it we will mark the position of the main spots. Then, keeping the telescope and the screen still, we wait a while for the image of the Sun to move because of the diurnal movement. Then we will mark some spots again. The line that links the new position with the old one will point us to the E-W address. Later we will look at the ephemeris the value of P (the position angle of the solar north pole, see heliographic coordinates) and taking it on the drawing we will have it oriented.
Using a photograph the method is similar. We will have to take two images of the Sun on the same photo, in a time interval of just over a minute, leaving the telescope motionless. The E-W direction will be marked by the displacement suffered by the spots between both images. It is necessary a great rigidity in the telescope and in the coupling of the camera, because a small deviation can suppose a considerable error in the positions. As before, the angle P will give us the direction of the solar axis.
The angle B0 (the inclination of the equator relative to the visual) still needs to be corrected. To achieve this we need a set of templates, each of them drawn to a different angle, and choose, with the help of the ephemeris, those whose inclination more closely approximates that of the moment of observation.
In the ephemeris we also obtain the length of the central meridian (L0) Since the templates only offer us the difference in length with respect to the meridian, adding this difference to L0 we determine the heliographic length of the spot.
The error provided by the templates is usually greater than 1º, due mainly to the imprecise drawing of the spots or to errors in the orientation of the image. However, some templates already allow to obtain with enough reliability the distribution of groups on the solar surface and to follow up on various aspects such as the law of Spörer or activity complexes.
Next, we provide a set of templates for different values of angle B0. The templates are drawn for positive B0 but can be used for negative B0 simply by turning them over.
Other methods
In the section on measurements with a reticle, an algorithm is shown to calculate the heliographic coordinates of a spot. The process begins by determining the rectangular coordinates on the apparent Sun, then corrections are made (P, B0) to obtain the coordinates on the real Sun and, finally, these are transformed into heliographic coordinates.
The coordinates in the apparent Sun (x1, y1, z1) were obtained from the times and the position angle of the reticle, but they can also be measured on a drawing or photograph.
Once again, the orientation of the image is crucial to obtain a good result. The details of this operation are explained in the section on measures with template.
When using templates, use the axis of solar rotation as a reference. However, it is now sufficient to refer the measurements to the N-S celestial direction, which saves us a step since the correction of the angle P is made with the algorithm.
If on the solar disk we define a coordinate system with the x axis to the west and to the celestial north, then (x1, y1) would be the distances in millimeters of the spot to both axes. Taking into account that now R is the radius (in millimeters) of the solar disk in the drawing or photograph, we can now go with these values to the algorithm, calculate z, make the corrections (P, B0) and obtain the heliographic coordinates of the spot .